A lazy daisy stitch is one of the stitches to make flowers. It uses between 2-6 strands of floss. You will have to knot the end of your thread for this stitch, don't use the loop method.
1. Start your stitch at the edge of the circle in the middle, directly under one of the dots (doesn't matter which one).
2. Come back down the fabric right next to, but not the same hole as where you came up. However, don't pull the thread all the way through; leave a loop (this needs to be at least the same height as the distance between the middle circle and the dot).
3. For your next stitch bring your needle up at the dot directly above your first stitch and as you come up put your needle through the loop and pull gently. This should make your first petal.
4. Next, come back down over the top of the petal. This will be right next to where you just came up but will secure the loop so it doesn't move.
5. For your second petal come up right next to your first one and directly under the next dot.
6. Repeat steps 1-5 until all of your petals are done. You fill the middle of the flower with a French knot or a satin stitch (your kit will specify this).
French knots are something I use a lot in my stitching. They are perfect for eyes and "i"s and also make pretty decorative stitches.
For a French knot you will have
to knot your thread; don’t use the loop method.
Come up through the back of the
fabric and point your needle down towards the fabric holding the needle. With
your other hand pull the thread that is coming out of the fabric taught. Put your needle over the top of it and wrap it around the thread twice. Sometimes you will have to wrap it around more than twice to make a bigger knot but your instructions that came with your kit will specify how many times.
Keeping hold of the thread, push your needle right next to (but not the same hole) as where you came up but
before you push it all the way through pull the thread again and keep hold of
it until you have pushed your needle through.
You should be left with a knot. These are quite tricky to get the hang of at first so you might want to practice in the corner of your fabric first.
For backing you hoop you will use 2-4 threads (it will state on your instructions with your kit how many to use) and you will have to knot the ends, don't use the loop method.
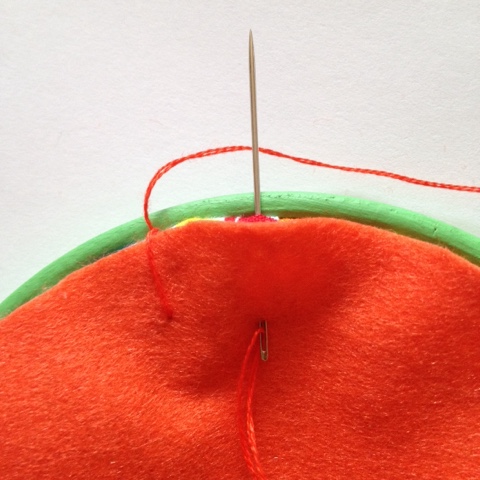
Start by doing a running stitch around the edge of your fabric. This is simply a normal stitch going in and out of your fabric. When you have gone all the way around pull gently and your fabric should bunch together. Next, do a back stitch to secure your fabric and come up through the edge of the fabric next to your hoop and place your felt at the back (you may have 2 pieces of felt; refer to your kit instructions for what to do with the other piece).
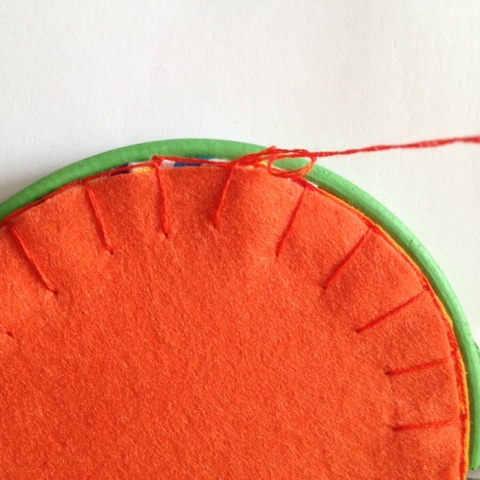
Now we will begin the blanket stitch. Put your needle in the felt about an inch away from the edge of the hoop. Come out right next to where you first came out and make sure your needle is in front of the thread. Pull gently and you will have made your first stitch.
For your second stitch put your needle in about an inch away from your first and and an inch away from the edge again. Come straight up by the edge of your fabric and again make sure the thread is behind your needle. Pull gently and you will have made your second stitch. Repeat until you reach the end.
When you do reach the end (or if you run out of thread) you need to secure your stitching. Make a small stitch where you have finished then make another in the same place but instead of pulling all the way bring your needle through the loop twice and pull. This should make a knot.
If you are at the end of the circle you will now need to make another knot at the next stitch. Take your needle across and under the thread of the next stitch (which is also your first stitch). Put it under again and come up through the loop like your did before to make a knot. Then to hide your excess thread push your needle down under the felt and pull. Snip your thread where it comes back out and you will have backed your hoop.
Any questions just pop me an email or a message on Facebook.
The satin stitch is used to fill small spaces and is another popular stitch on my designs. If the design uses this stitch I will include a paper pattern in your kit showing you the easiest direction to stitch in (of course you can change it if you like though).
Bring your needle up at the edge of your shape then insert it across onto the opposite side of the shape (when coming through the back don't forget the loop if you haven't knotted it).
For your second stitch bring your needle up through the fabric right next to (but not the same hole) your starting hole on the opposite side. And bring it back down right next to (but not the same hole) at your second hole on the opposite side agan.
Keep repeating this until your whole shape is filled.
If you need any help just pop me an email or message me on Facebook
Back stitch makes an appearance on nearly all of my hoops and is a very easy stitch once you have the hang of it.
1. Bring your needle through the back of your fabric where you want to start. Make your first stitch by coming down through the front of your fabric (don't forget the loop at the back!).
2. Then start your second stitch a stitch length away from your first, working in the direction you want to go. Finish your stitch by coming down through the front of your fabric in the same hole and where your first stitch finished (so you will be stitching in the opposite direction here - backwards).
3. Repeat step 2 until you reach the end of the line you are stitching.
Any questions just pop me an email or message me on Facebook