Musings from my work at home life with instructions for stitching my cross stitch and embroidery hoops.
Wednesday 16 September 2015
Thursday 10 September 2015
French knot
French knots are something I use a lot in my stitching. They are perfect for eyes and "i"s and also make pretty decorative stitches.
For a French knot you will have
to knot your thread; don’t use the loop method.
Come up through the back of the
fabric and point your needle down towards the fabric holding the needle. With
your other hand pull the thread that is coming out of the fabric taught. Put your needle over the top of it and wrap it around the thread twice. Sometimes you will have to wrap it around more than twice to make a bigger knot but your instructions that came with your kit will specify how many times.
Keeping hold of the thread, push your needle right next to (but not the same hole) as where you came up but
before you push it all the way through pull the thread again and keep hold of
it until you have pushed your needle through.
You should be left with a knot. These are quite tricky to get the hang of at first so you might want to practice in the corner of your fabric first.
Any questions please just get in touch:
hannahhandmakes@gmail.com
www.facebook.com/hannahhandmakes1
Happy stitching! x
Saturday 5 September 2015
Blanket stitch/backing your hoop
For backing you hoop you will use 2-4 threads (it will state on your instructions with your kit how many to use) and you will have to knot the ends, don't use the loop method.
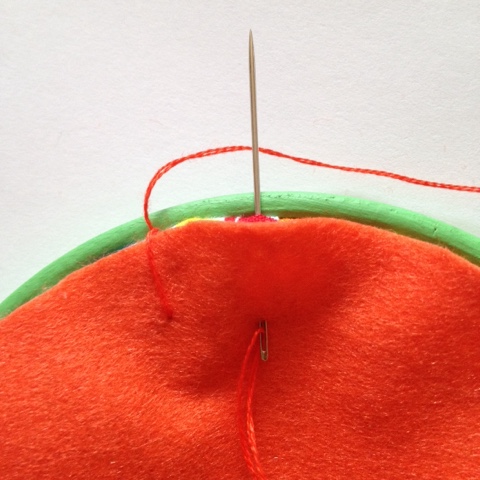
Start by doing a running stitch around the edge of your fabric. This is simply a normal stitch going in and out of your fabric. When you have gone all the way around pull gently and your fabric should bunch together. Next, do a back stitch to secure your fabric and come up through the edge of the fabric next to your hoop and place your felt at the back (you may have 2 pieces of felt; refer to your kit instructions for what to do with the other piece).
Now we will begin the blanket stitch. Put your needle in the felt about an inch away from the edge of the hoop. Come out right next to where you first came out and make sure your needle is in front of the thread. Pull gently and you will have made your first stitch.
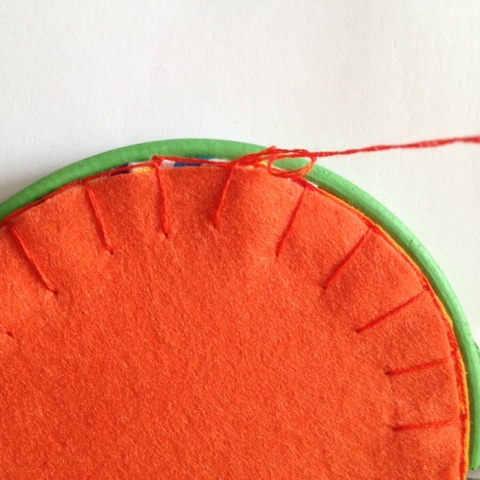
For your second stitch put your needle in about an inch away from your first and and an inch away from the edge again. Come straight up by the edge of your fabric and again make sure the thread is behind your needle. Pull gently and you will have made your second stitch. Repeat until you reach the end.
When you do reach the end (or if you run out of thread) you need to secure your stitching. Make a small stitch where you have finished then make another in the same place but instead of pulling all the way bring your needle through the loop twice and pull. This should make a knot.
If you are at the end of the circle you will now need to make another knot at the next stitch. Take your needle across and under the thread of the next stitch (which is also your first stitch). Put it under again and come up through the loop like your did before to make a knot. Then to hide your excess thread push your needle down under the felt and pull. Snip your thread where it comes back out and you will have backed your hoop.
Any questions just pop me an email or a message on Facebook.
hannahhandmakes@gmail.com
www.facebook.com/hannahhandmakes1
Wednesday 2 September 2015
Ways to use my pocket hoops
I love my pocket hoops (if I do say so myself). I currently have 2 hanging up in my home, I'm making a third and I have a fourth in the pipe line. All for different rooms in the house.
In my work/nappy room (we use cloth nappies so they obviously need half a room to show them all off) I have one hanging up holding twine, scissors and pens; all things that I use when packaging my parcels up. It hangs above a set of draws which hold all the bubble wrap, bags, stickers, tissue paper ect so it's all very organised (unlike the rest of my home).
I have another on the wall in my kitchen which is in between my living room and conservatory and I use all 3 of these rooms to work in so this hoop is in the perfect place. It currently holds some glitter gel pens, pencils, a paint brush and scissors; all of which I use every day.
The third is going to be a business card holder because I usually have to dig around some sort of box or draw to quickly try and find one. I can't wait for them to all be in one place!
The fourth I have planned is actually going to be for my glasses. There is nothing worse than being all warm in bed and having to get up to put your glasses somewhere. So I don't. I usually end up putting them on the floor where little feet stand all over them in the morning. But I have just got brand new glasses so that won't be happening any more. I have seen some gorgeous glasses fabric over at West Coast Fabrics (www.facebook.com/westcoastfabrics) that has inspired me to make a pocket hoop that can hang at the side of my bed and I can put my glasses in there over night and when I have my contacts in.
Other things you can put in them are make-up brushes; crayons to keep them high up away from little fingers (I speak from experience of coming down stairs one morning to a re-decorated, crayon wall); your pegs; colouring pencils; hairbrushes; ribbon; receipts. Even baby items in the nursery. And a recent customer has used them for her crochet hooks. The list is truly endless.
If you would like to buy a pocket hoop they are available in my etsy shop:
https://www.etsy.com/uk/shop/HanHandMakes?section_id=17326736&ref=shopsection_leftnav_4
Or contact me on Facebook: www.facebook.com/hannahhandmakes1
Love & stitches! X
Subscribe to:
Posts (Atom)


